Understanding Motor Nameplates
A motor nameplate is essentially the motor’s identification card. It contains vital information that helps engineers, procurement teams, and maintenance personnel understand the motor’s specifications, capabilities, and application suitability. Found affixed to the motor housing, the nameplate typically displays data such as rated voltage, horsepower, current, frequency, efficiency class, speed, and frame size. Each of these details serves a specific purpose: for instance, voltage and current ratings indicate operating limits, while the efficiency class aids in energy consumption assessments. Properly reading and interpreting the nameplate ensures you select the right motor for your application, meet regulatory standards, and avoid costly mismatches during maintenance or replacements. Understanding this information is critical for safe and efficient installation and use.

Key Components of a Motor Nameplate
- Manufacturer Information: Includes the name or logo of the manufacturer along with the motor’s model or catalog number. This helps in identifying the specific product for reordering, warranty claims, or technical support.
- Voltage Rating: Indicates the electrical input range the motor is designed to operate within, such as 230V, 400V, or dual 230/460V. Staying within the recommended voltage ensures optimal performance and prevents damage.
- Frequency and Phases: Typically listed as 50 Hz or 60 Hz for frequency and 1~ (single-phase) or 3~ (three-phase). This defines the motor’s compatibility with power supply systems in different regions.
- Horsepower (HP) or Kilowatt (kW): Shows the motor’s power output, such as 2 HP or 1.5 kW. This parameter is key for determining the motor’s suitability for driving a specific load.
- Full-Load Current (FLA): Specifies the current the motor draws when operating at full load. This is crucial for correctly sizing circuit protection devices and conductors.
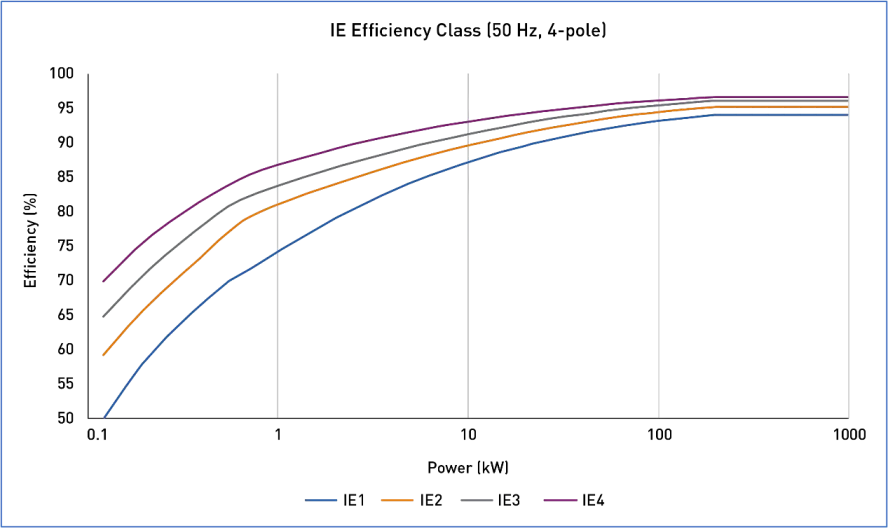
- Efficiency Class: Classified as IE2, IE3, or IE4 (in IEC-based systems), it rates the motor’s energy efficiency. Higher classes like IE4 are preferable for energy savings but may cost more initially.
- Frame Size: An alphanumeric code like 90L or 112M defines the motor’s physical dimensions and mounting style. This ensures interchangeability with similar motors in the same IEC frame size.

Step-by-Step Guide to Reading a Motor Nameplate
- Locate the motor nameplate on the motor housing. It is typically a metallic plate riveted or affixed to the exterior of the motor using screws or adhesive.
- Identify the manufacturer and model number. These details are usually on the top of the nameplate, indicating the brand and specific motor type for reference or reordering.
- Check the voltage rating. This usually appears as a single value (e.g., 230V) or a range (e.g., 230/460V). It tells you the supply voltage the motor is designed to handle.
- Look at the power output, listed in horsepower (HP) or kilowatts (kW). This defines how much mechanical power the motor can deliver at full load.
- Read the frequency and phase information. The nameplate will display the rated frequency, generally 50 Hz or 60 Hz, and whether it is single-phase (1~) or three-phase (3~). This ensures compatibility with the power supply.
- Note the efficiency class, like IE2, IE3, or IE4. Higher efficiency motors consume less energy and may qualify for energy rebates or meet local regulatory standards.
- Find the full-load current (FLA). This value indicates the current draw when the motor operates at full capacity, useful for wiring and circuit protection.
- Reference the frame size. Typically denoted by numbers and letters, it describes the motor’s physical dimensions and mounting requirements, ensuring compatibility with your application.

Frequently Asked Questions About Motor Nameplates
What does the efficiency class on a motor nameplate indicate?
The efficiency class on a motor nameplate, such as IE2, IE3, or IE4, indicates the motor’s energy efficiency level as defined by international standards like IEC 60034-30-1. Higher classes, such as IE4, signify better energy efficiency, which can lead to lower operating costs over time. Selection depends on regulatory requirements and operational priorities, especially in regions with energy mandates like the EU.
What information on the nameplate determines a motor’s compatibility with a specific power supply?
The nameplate’s voltage rating, frequency (50 Hz or 60 Hz), and phase specification (single-phase 1~ or three-phase 3~) are critical to determining compatibility with the power supply. For example, a 230V, 50 Hz motor won’t be suitable for a system that operates at 460V and 60 Hz unless it’s dual-rated. Verifying these settings is essential before installation.
Does the nameplate include details about the motor’s expected operating current?
Yes, the nameplate indicates the Full-Load Current (FLA), which is the current the motor draws when operating at its full load capacity. This value helps engineers properly size circuit protection devices, wiring, and connectors while ensuring safe operation and avoiding overload scenarios.
Safety Considerations When Reading Motor Nameplates
Reading a motor nameplate might seem straightforward, but safety considerations should not be overlooked. First, always ensure the motor is powered down and locked out following standard lockout/tagout (LOTO) procedures before approaching it. Motor housings can carry residual voltage even when active power is disconnected, especially if capacitors or auxiliary circuits are present. Wearing appropriate personal protective equipment (PPE), such as insulated gloves, can further mitigate risks of accidental contact with live components. Additionally, be cautious of the motor’s surface, as it may remain hot for some time after operation.
When deciphering specifications like voltage, frequency, or current ratings, confirm the details match the application’s power supply. Mismatched parameters can cause equipment failures, overheating, or electrical faults. For hazardous environments (such as those requiring explosion-proof motors), ensure the enclosure and certifications (e.g., IP ratings) listed on the nameplate comply with site-specific safety standards. Taking these precautions ensures both personal safety and protects the motor from avoidable damage during inspection or installation.